Introduction to Docker
Instructor: Chris Fulton
Learning Objectives
- Understanding what is Docker?
- Images | Containers | Virtual Machines | Containers vs. Virtual Machines
- Practical Use Cases for Web Developers | Containers and Microservices
- Installing Docker
- Docker Desktop | VS Code Plugin | Running Sample Container
- Docker Workflow
- Commonly used Commands
- Docker Hub
- Dockerfile | .dockerignore file
- Containerizing an application
- Docker Compose
- Kubernetes and Swarm
- Deploying + Hosting Containers
What is Docker?
Docker is a set of platform as a service products that uses OS-level virtualization to deliver software in packages called containers.
What is Docker cont.?
Images
is a file, comprised of multiple layers, that is used to execute code in a Docker container. Images are created from a Dockerfile with the docker build command.
Containers
are isolated units of software that packages up code and all its dependencies so the application runs quickly and reliably from one computing environment to another. A runnable instance of an image
Virutal Machines
a virtual machine is an emulation of a computer system. A virtual machine is sandboxed from the rest of the system, meaning that the software inside a virtual machine can’t escape or tamper with the computer itself.
Containers vs. Virtual Machines
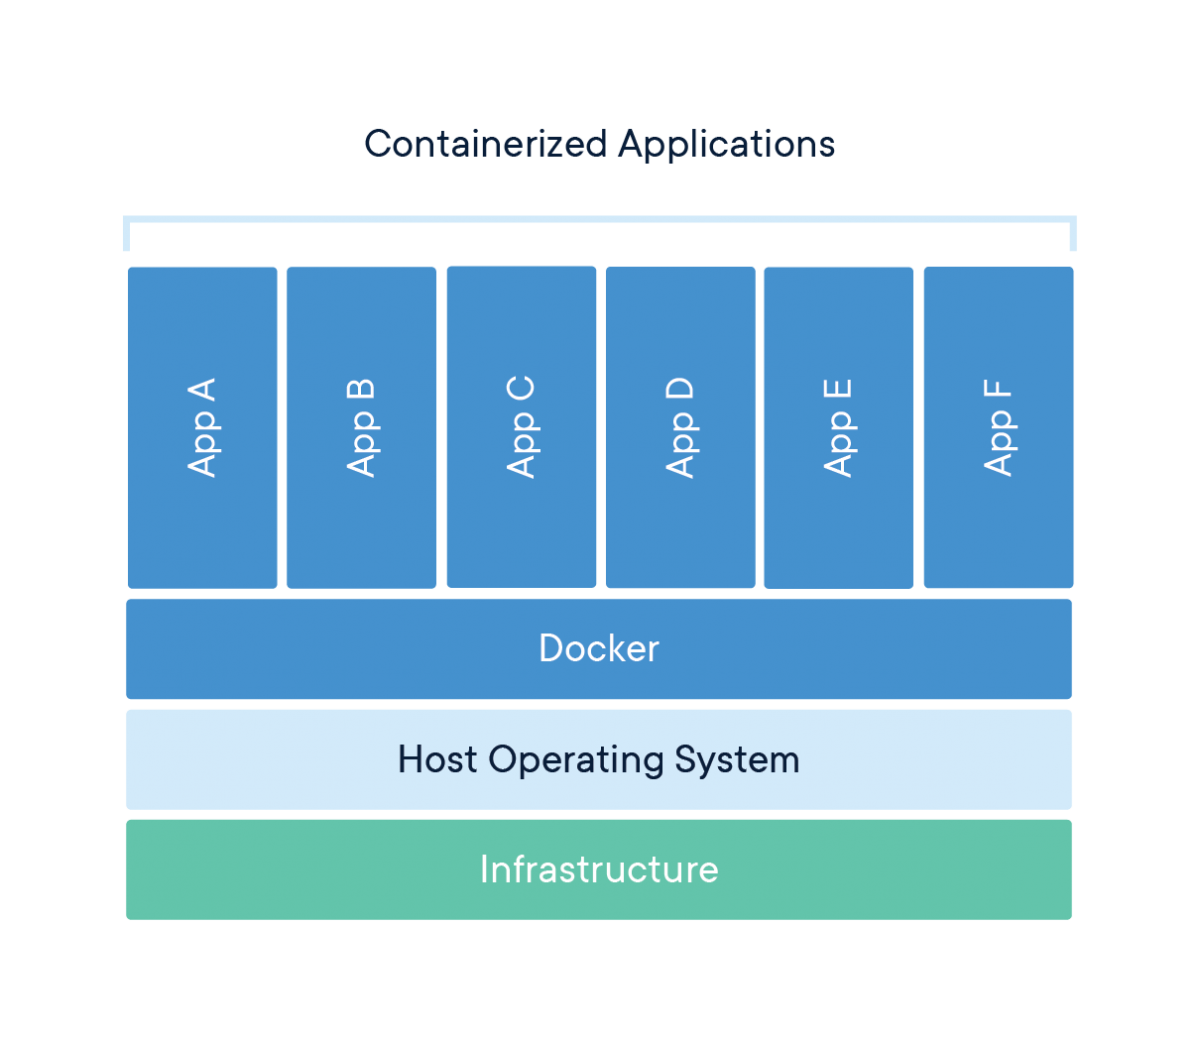
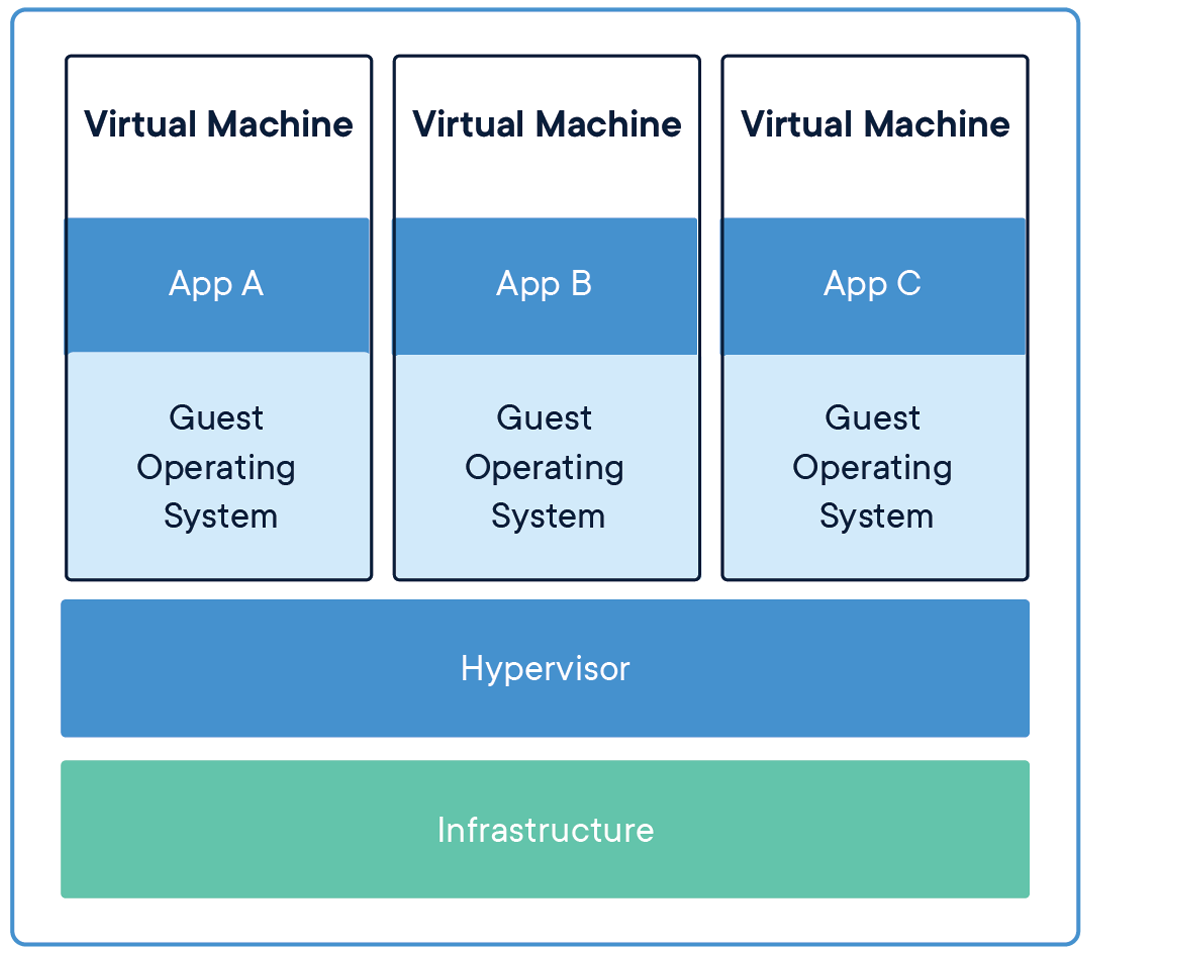
Containers and virtual machines have similar resource isolation and allocation benefits, but function differently because containers virtualize the operating system instead of hardware. Containers are more portable and efficient.
Containers and Microservices
What does Microservices have to do with container orchestration? Please watch the video below in your own time. The video provides an overview of microservices and how containers are orchestrated.
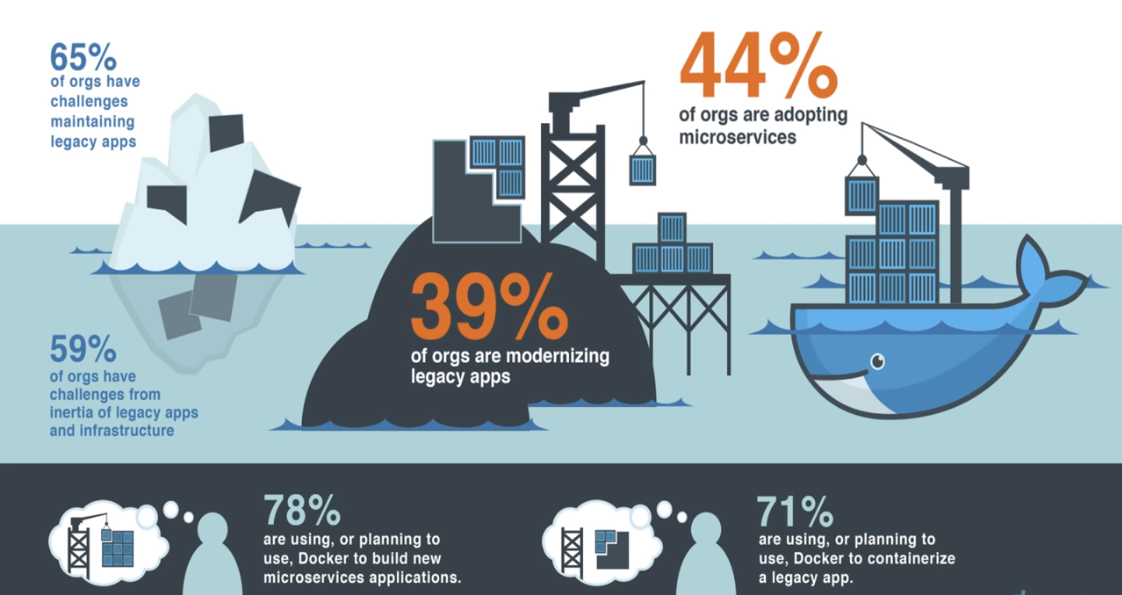
Docker Use Cases
Simple Environment Configuration
Simple configuration is the primary use case of Docker
App Isolation & Testing
Cautious of erraneous code can be ran in a contained environment. Testing and previewing new applications. Using Docker Hub to pull down preconfigured applications.
Rapid Deployment and Scaling
Easier to deploy an application that runs within a container that contains all of the application processes
Code Pipeline Management
Docker eases the code development and deployment pipeline and offers a consistent environment for the application from dev through production.
Containers vs. Virtual Machines
Please watch the video below in your own time. The video highlights the difference between virtual machines and containers.
What execution environment should your microservices applications use? That is, in what kind of environment should they run?
The best choice for running a microservices application architecture is application containers. Containers encapsulate a lightweight runtime environment for your application, presenting a consistent software environment that can follow the application from the developer's desktop to testing to final production deployment, and you can run containers on physical or virtual machines.
Installing Docker
Install Docker
Installing Docker on Windows
1) Navigate to docker.com/get-started to download for windows.
2) Click on the download button for Windows
3) Run the executable file to install docker on machine.
Using Docker Plugin in VS Code
1) Within Visual Studio Code, navigate to the extensions tab on the left
2) Search for Docker from Microsoft and install
Activity A - Running Sample Container
									# Lets us know the version of docker
									docker --version

									# Pulling the hello-world image from Docker Hub and runs the container
									docker run hello-world

									# Command to display on the images
									docker image ls

									# Stops container and removes container
									docker container stop hello-world

									docker container rm hello-world
Step 1
Open Visual Studio code and click on the extensions tab/icon.
Step 2
Open terminal and run the various commands above.
Step 3
Stop container and remove container
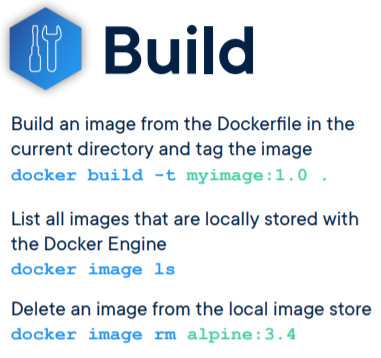
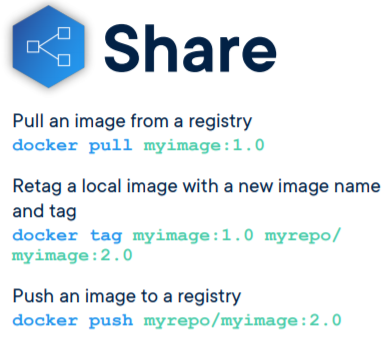
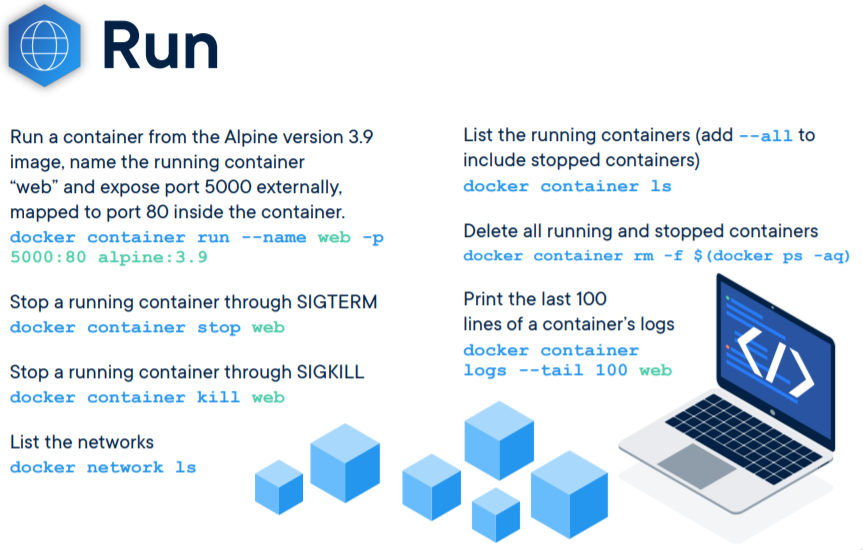
Docker Workflow
Docker CheatSheet and Commands
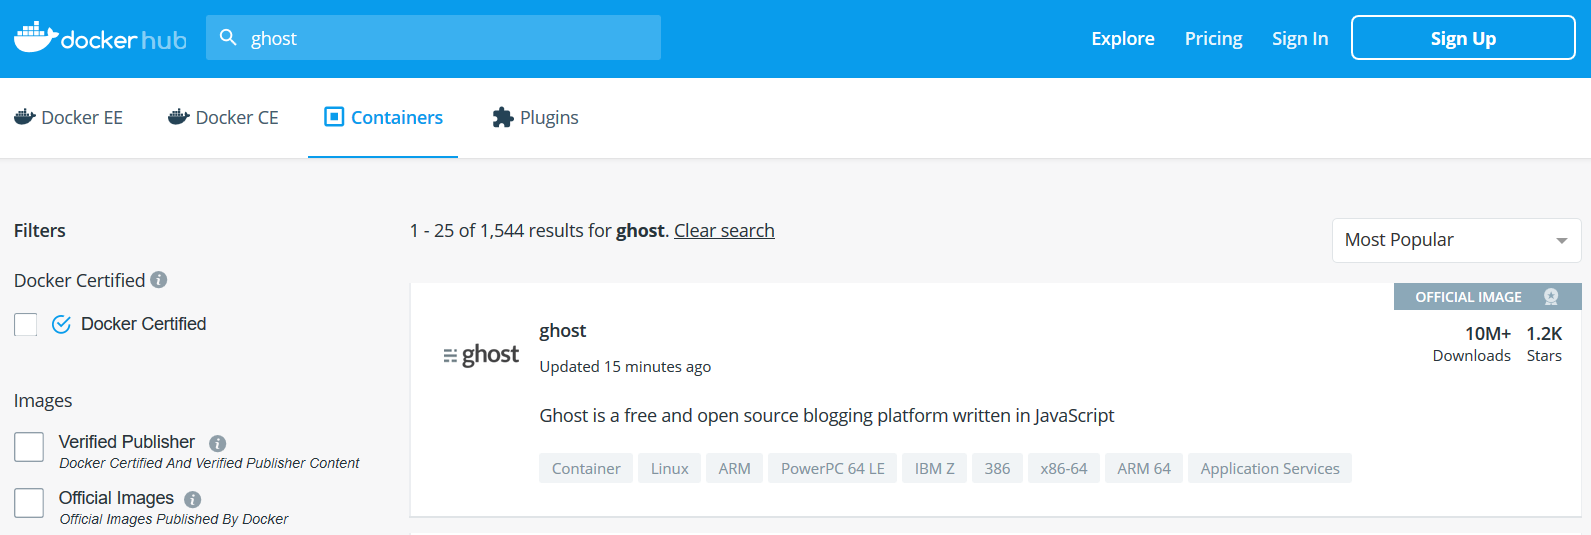
Docker Hub
DockerHub - the world's easiest way to create, manage, and deliver your teams' container applications.
Activity B -Pulling container from docker hub
Step 1
Navigate to hub.docker.com and make sure you create an account and complete initial walkthrough that has you create and push up a container.
Step 2
Navigate to the Explore tab and search for ghost image. Click on ghost image and copy command docker run -d --name some-ghost -e url=http://localhost:3001 -p 3001:2368 ghost. Open in browser and explore ghost blog platform. The -p 3001:2368 is mapping my machines port to the containers port.
Step 3
Stop container by running command [docker container stop some-ghost] and remove container by running command [docker container rm some-ghost]
Dockerfile
What is a dockerfile - a text file that contains all commands, in order, needed to build a given image
- Directives - provides instructions on how the image is constructed and ran as a container.
- The best way to learn how a dockerfile is constructed is to look at how other dockerfiles have been constructed.
# Define from what image we want to build from
FROM node:14.18.1

# Provides metadata regarding the Dockerfile
LABEL version="1.0"
LABEL description="Docker image for class example "
LABEL maintainer = "cifulton@uic.edu"

# Sets the working directory for application in container
WORKDIR /app

# Which files would we like to copy into the construction of the image
COPY . /app

# What commands we would like to run once
CMD ["node", "app/docker.js"]
Dockerfile Directives
FROM
Defines the image we will use as the basis for our container.
LABEL
Defines the metadata for our Dockerfile, including information about the version, description, and maintainers.
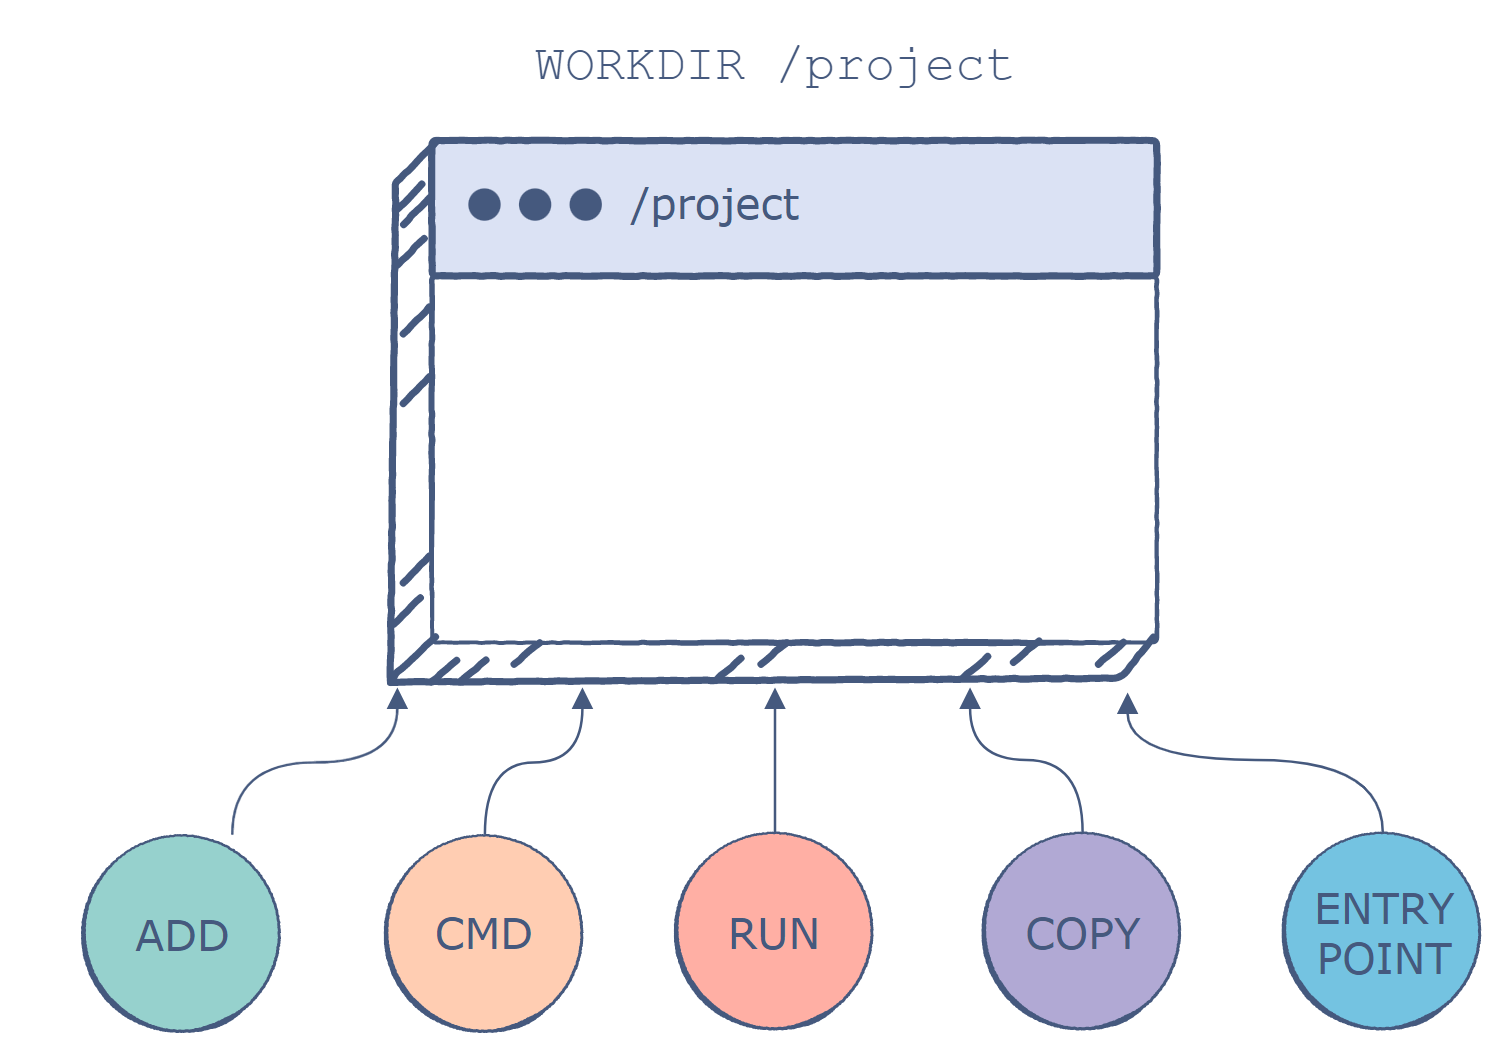
WORKDIR
Sets the working directory for the application. If the working directory does not already exist, it is created by Docker.
COPY
Copy a file or files into the Docker container.
RUN
Specifies a command that should be run by Docker. You typically use this command to install dependencies, debug, and execute commands in the container.
EXPOSE
Tells Docker which ports the container should listen on during runtime.
CMD
Specifies the command that should be executed when the docker container starts.
Creating Dockerfile Steps
1. Create a file called dockerfile
Create a folder and run the touch command to create a Dockerfile. No file extension is needed.
2. Add Instructions in Dockerfile
Dockerfile reference can be found at this link
3. Build Dockerfile to create image
Run the docker build -t newimagename:1.0 to construct image that is now named "newimagename" version "1.0"
4. Run Image to create container
Run the command docker container run --name to run the container.
5. Stop and remove container
Run the command docker container stop [NAME_OF_CONTAINER] and run the command docker container rm [NAME_OF_CONTAINER]
Activity C - Generating Image from Dockerfile
								# Step 1 - Defines and invokes function
								dockerSucessOutput();
								function dockerSucessOutput(){
								    console.log("Dockerfile correctly constructed and image and ran program");
								}

								# Step 2 - Including directives into Dockerfile
								FROM node:14.18.1
								COPY . /app

								CMD ["node", "app/docker.js"]

								# Step 3 - Stop container
								docker container stop sample_walkthrough .
Step 1
Create a project folder and add a file called docker.js. Within the docker.js file copy the code under step 1 and save.
Step 2
Create a Dockerfile by running command [touch Dockerfile]. Within the docker file, copy the statements under step 2.
Step 3
Build the image by running command [docker build -t sample_walkthrough .]. Observe the output in console and stop container by running the command above under step 3.
Docker Compose
Compose is a tool for defining and running multi-container Docker applications. With Compose, you use a YAML file to configure your application’s services.
Docker Compose
YAML File Examples below:
Containers: front-end + back-end
								version: '1'
								services:
								  front:
								    build: ./front
								    ports:
								      - '3000:3000'
								    depends_on:
								      - back
								  back:
								    build: ./back
								    ports:
								      - '8080:8080'
Containers: MySQL DB + Wordpress CMS
								version: '2'

								services:
								   db:
								     image: mysql:5.7
								     volumes:
								       - db_data:/var/lib/mysql
								     restart: always
								     environment:
								       MYSQL_ROOT_PASSWORD: rootpasswordchangeme
								       MYSQL_DATABASE: wordpress
								       MYSQL_USER: usernamechangeme
								       MYSQL_PASSWORD: passwordchangeme

								   wordpress:
								     depends_on:
								       - db
								     image: wordpress:latest
								     ports:
								       - "8000:80"
								     restart: always
								     environment:
								       WORDPRESS_DB_HOST: db:3306
								       WORDPRESS_DB_USER: usernamechangeme
								       WORDPRESS_DB_PASSWORD: passwordchangeme
								volumes:
								    db_data:
Getting Started with Docker Compose
1. Build individual images or pull them from a registry.
Make sure each service has it's own Dockerfile that builds an image.
2. Define all services in a docker-compose.yml file.
Once each service has a dockerfile, consider the placement of the .yaml file
3. Run command
Run all of them together using the docker-compose CLI. docker-compose up -d
Kubernetes
Why Kubernetes?
Service discovery and load balancing
Kubernetes is able to load balance and distribute the network traffic so that the deployment is stable.Storage orchestration
Kubernetes allows you to automatically mount a storage system of your choice, such as local storages, public cloud providers, and more.Automated rollouts and rollbacks
Kubernetes can create new containers for your deployment, remove existing containers and adopt all their resources to the new container.Automatic bin packing
You tell Kubernetes how much CPU and memory (RAM) each container needs. Kubernetes can fit containers onto your nodes to make the best use of your resources.Self-healing
Kubernetes restarts containers that fail, replaces containers, kills containers that don't respond to your user-defined health check, and doesn't advertise them to clients until they are ready to serve.Self-healing
Kubernetes lets you store and manage sensitive information, such as passwords, OAuth tokens, and SSH keyssource: https://kubernetes.io/docs/concepts/overview/what-is-kubernetes/
Kubernetes Architecture
Kubernetes runs your workload by placing containers into Pods to run on Nodes
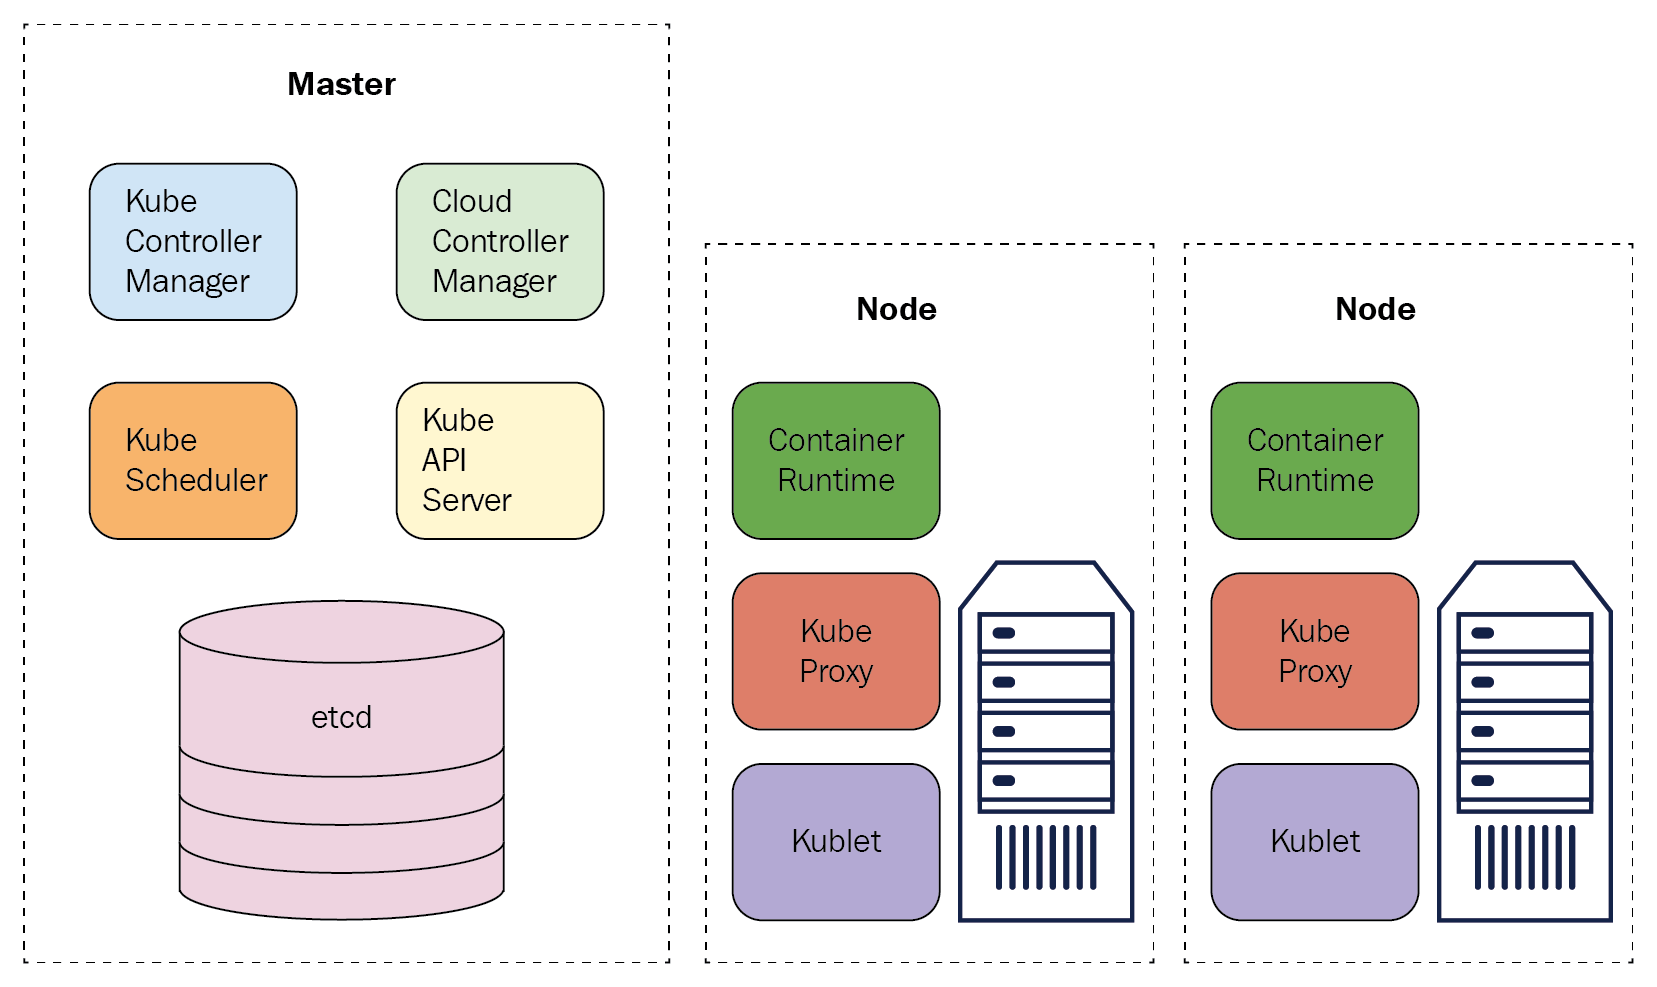
Master Node [3 Components]
A master node is a node which controls and manages a set of worker nodes (workloads runtime) and resembles a cluster in Kubernetes.
Worker Nodes
A Node is a worker machine in Kubernetes and may be either a virtual or a physical machine, depending on the cluster. Each Node is managed by the control plane. A Node can have multiple pods, and the Kubernetes control plane automatically handles scheduling the pods across the Nodes in the cluster.
Pods
Pods are the smallest, most basic deployable objects in Kubernetes. A Pod represents a single instance of a running process in your cluster. Pods contain one or more containers, such as Docker containers.
Question 1
How would you best describe Kubernetes?
- A. a subscription platform designed to manually deploy scaling and operating applications within containers
- B. an open-source platform designed for manually deploying, scaling, and operating application containers
- C. a subscription platform designed to automate deploying, scaling, and operating application containers
- D. an open-source platform designed to automate deploying, scaling, and operating application containers
Question 2
What does kubernetes do?
- A. Install Docker and sets up a cluster across multiple VMs
- B. Manages containers and other resources defined in a YAML file
- C. Build container images across a cluster of machines
Question 3
How does kubernetes group containers together?
- A. In a cluster, where all containers are deployed on the same VM
- B. In a service, where all containers share the same networking namespace
- C. In a pod, where all containers share the same network and compute environment
Question 4
Which feature in kubernetes assigns pods to a node at runtime?
- A. scalability and availability
- B. service discovery
- C. container scheduling
- D. flexibility and modularization
Good Video - Kubernetes in 5min
Documentation on getting started with Kubernetes using docker desktop. Link found here.
Deploying Containers
Deploying Container
GitHub Actions Deployment of container
		# Your workflow name.
name: Deploy to heroku.

# Run workflow on every push to master branch.
on:
  push:
    branches: [main]

# Your workflows jobs.
jobs:
  build:
    runs-on: ubuntu-latest
    steps:
      # Check-out your repository.
      - name: Checkout
        uses: actions/checkout@v2


### ⬇ IMPORTANT PART ⬇ ###

      - name: Build, Push and Release a Docker container to Heroku. # Your custom step name
        uses: gonuit/heroku-docker-deploy@v1.3.2 # GitHub action name (leave it as it is).
        with:
          # Below you must provide variables for your Heroku app.

          # The email address associated with your Heroku account.
          # If you don't want to use repository secrets (which is recommended) you can do:
          # email: my.email@example.com
          email: ${{ secrets.HEROKU_EMAIL }}

          # Heroku API key associated with provided user's email.
          # Api Key is available under your Heroku account settings.
          heroku_api_key: ${{ secrets.HEROKU_API_KEY }}

          # Name of the heroku application to which the build is to be sent.
          heroku_app_name: ${{ secrets.HEROKU_APP_NAME }}

          # (Optional, default: "./")
          # Dockerfile directory.
          # For example, if you have a Dockerfile in the root of your project, leave it as follows:
          dockerfile_directory: ./

          # (Optional, default: "Dockerfile")
          # Dockerfile name.
          dockerfile_name: Dockerfile

          # (Optional, default: "")
          # Additional options of docker build command.
          docker_options: "--no-cache"

          # (Optional, default: "web")
          # Select the process type for which you want the docker container to be uploaded.
          # By default, this argument is set to "web".
          # For more information look at https://devcenter.heroku.com/articles/process-model
          process_type: web


### ⬆ IMPORTANT PART ⬆ ###
References
- https://github.com/docker/labs/blob/master/beginner/chapters/webapps.md
- https://dzone.com/articles/a-developers-guide-to-docker-docker-compose
- https://data-flair.training/blogs/docker-use-cases/
- https://www.docker.com/resources/what-container
- https://gravitational.com/blog/microservices-containers-kubernetes/
- https://github.com/wsargent/docker-cheat-sheet#dockerfile